
How to Grow Oyster Mushrooms
The world of mushroom growing is booming, and no mushroom is getting more attention than the oyster mushroom (Pleurotus sp.). There are many reasons for this. Oyster mushrooms, of course, taste delicious. However, they are also one of the easiest mushrooms to grow, and they grow quite fast.
If you’ve been contemplating growing mushrooms, oysters are the place to start and get a feel for the growing process. With some methods, you’ll have a huge crop of mushrooms in just a couple of weeks.
There are several ways to grow oyster mushrooms. These range from extremely low-effort grow kits available in stores and online, to purchasing spores and inoculating a growing medium like straw, sawdust or coffee grounds. Whichever method you choose, the results are well worth it — a fresh, prolific cluster of delicious mushrooms!
Growing oyster mushrooms doesn’t take a lot of space or doesn’t demand much of your time. Given the right conditions, they will grow on their own with minimal effort.
Types of Oyster Mushrooms
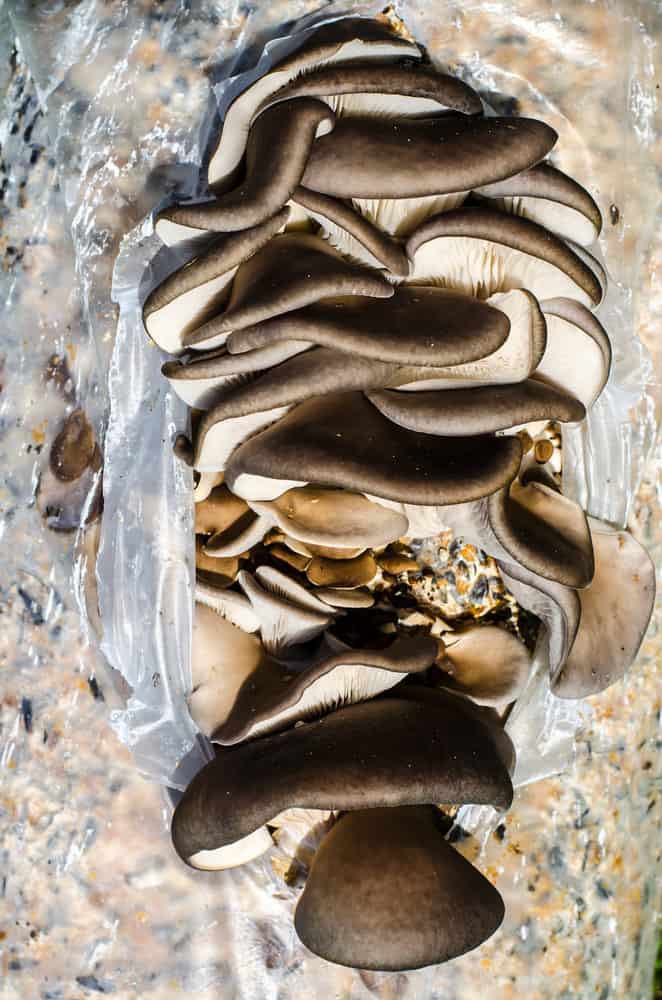
The oyster mushroom you may be most familiar with is gray. However, oyster mushrooms are also pink, yellow (golden), and black. These mushrooms are all similar in shape, size, and flavor, with the variance in color being the main difference. They grow in clusters of dozens, or even hundreds, of overlapping mushrooms.
King trumpet oysters are another type of oyster mushroom, and they are quite different. They are much larger, with extremely thick stems, and grow individually, like massive columns, instead of in clusters. The flavor and texture of this type are denser and meatier. King trumpet mushrooms are finicky growers.
Cultivating Oyster Mushrooms with a Grow Kit
A grow-kit is a box or bag of mushroom spores that are prepared by the seller to grow the oyster mushrooms. Most often, it is an inoculated sawdust block in an attractive box with the name of the oyster type written on it. The instructions are easy to follow: make slits in the box or bag, place it in a humid location, and spritz it with water twice a day.
In approximately 2-3 weeks, you’ll have a ready harvest of mushrooms. Many kits will produce a second, or even third, crop of mushrooms from the same block.

When considering purchasing an oyster grow kit, be sure to buy from a reputable seller. Look for reviews from previous customers and note their experiences. Mushroom growing depends entirely on the quality of the spores and the care taken in inoculating the blocks. Oyster mushroom kits average around $25-$40.
Popular Oyster Mushroom Grow Kits
- North Spore Grow Your Own Kit
- Root Mushroom Farm
- Field & Farm Oyster Table Top Farm
- Forest Origins Grow Kit
Growing Oyster Mushrooms From Spores
Inoculating your own grow medium with spores takes a little more effort and understanding than simply buying a grow kit. For starters, understanding what spores, medium, and inoculation mean is necessary. Like all things that grow, mushrooms have a reproduction cycle that is unique to its’ species.
Oyster mushrooms are the easiest to start with because they are truly forgiving, meaning they don’t need to have as exact an environment as other mushroom types.
Mushroom Growing Terminology
Spores/Spawn: Spores are like the seeds of the mushroom. They are produced by mature specimens and are necessary for reproduction. Spawn is made up of many spores.
Medium: This is the material that is used to grow the mushrooms, where the spores are “planted.” Oyster mushrooms grow on many mediums, like straw, logs, coffee grounds, and sawdust.
Inoculation: The process in which the spores are added to the medium, the “planting” or “seeding” required for the mushrooms to grow.
Incubation: Like vegetable seeds need particular conditions to germinate, mushrooms spores need a specific setting to get started.
Fruiting: The term for when the mushrooms start producing.
In addition to understanding the life cycle of a mushroom, a grower also needs to provide the correct environment for growth. This requires special growing equipment, as well.
Grow Oyster Mushrooms on Straw
What You’ll Need:
- Oyster Mushroom Spawn (this is easily ordered online. Only order from reputable sellers, like Fungi Ally, Mushroom Mountain, or North Spore)
- Straw
- Mushroom Cultivation Grow Bags
- A large cooking pot
- Large mesh strainer
- Sturdy tongs
- Rubber gloves
- Thermometer
- Large tub
- Clean plastic tarp
- Twist ties if bags aren’t self-sealable
- A nail or skewer for poking holes in the bag
- Lawnmower, clippers, or otherwise to cut straw
- A cool, dry, ventilated area prepared in advance to hang the bags
- Spritz bottle with water
The Math:
You’ll need approximately 1lb of spawn per 5lbs of straw. This will fill one grow bag. [1:5 formula]
- Compile all your supplies before you get started!
- Cut straw into 1-3” pieces. A lawnmower makes quick work of this, especially if you are filling lots of bags. A good pair of clippers also works well but takes much longer. The small pieces are necessary for successful growth as they provide better airflow.
- Pasteurization: This is absolutely necessary and must not be skipped, even though it can be messy and time-consuming. The straw must be free of all bacteria and other microscopic fungi, or else the bag will become contaminated and not grow what you want.
- a) Clean your workspace thoroughly. There is no point to pasteurization if you’re going to contaminate it again directly afterward. This includes all the tools you’ll be using – tongs, strainer, tub, thermometer.
- b) Fill the large pot half-way with water and heat to 160-170F. Use the thermometer to measure and ensure it stays at this temperature.
- c) Add the straw and keep it there for an hour. Use a lid or weighted object to keep the straw submerged. Continuously check the temperature and adjust heat as needed.
- d) Set up the tub nearby with the mesh strainer.
- e) Using the tongs, remove the straw from the pot and put it in the strainer over the tub to drain as much water as possible. This may need to be done in several batches. Everything is going to be extremely hot – use rubber gloves if needed.
- f) Move strained straw to tarp to cool.
- g) Let straw cool to at least 100F before moving to the next step. Hot straw will kill mushroom spawn.
- Inoculation: Once the straw is 100F or cooler, mix the spawn with the straw, using the 1:5 formula. Straw must be wet still, do not let it dry out. Break up the straw clumps as you go and mix extremely well. [Use clean gloves to do this or well-cleaned and sanitized hands and arms – anything that comes into contact with the straw and spawn must be sterile.]
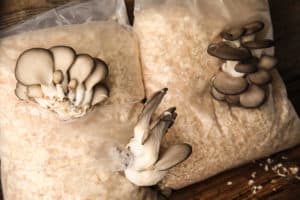
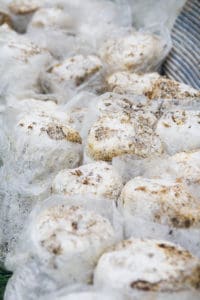
- Filling Bags:
- a) Fill each bag with approximately 5lbs of inoculated straw, packing it in good, but not so tight so it becomes compressed.
- b) Secure the top of each bag with a twist tie, or tape.
- c) Sterilize the skewer or nail by pouring boiling water over it.
- d) Poke holes in the bag every 3-4 inches. This allows air to flow in and the mushrooms to grow out.
- Waiting:
- a) Hang the bags in the prepared cool, dark space. Ideal temperature is between 60-75F. There should be exact specifications listed on the spawn bag.
- b) Check it every day just to make sure the straw doesn’t dry out. If it does, spritz it with water a through the holes just so it is damp.
- c) In 2-8 weeks, white mycelium will begin to show inside the bag. This is great!
- d) When the entire bag is covered, usually in 10-21 days, move to the next step.
- Fruiting:
- a) Introduce a little light, or move the bags to a place with some light. They still need the same temperatures and ventilation. Do not put them in direct light! Very little is needed. Near a window is good.
- b) The mushroom will begin to grow out of the holes. You don’t need to make them any larger; the mushrooms will find their way. This is calling pinning.
- c) Mist them 2-3 times a day as they grow. Just so they are moist, don’t overdo it.
- d) In 5-7 days, they are ready for harvesting. Cut or twist them off at the base, leaving the base in the bag to promote another growth.
It’s an amazing process to watch, mushrooms growing from what looks like white spidery webs to prolific clusters of fruit-bodies. They somehow taste better, too, when home-grown. Whether you choose the grow kit or the DIY option, don’t be surprised if it becomes an obsession. Enjoy and happy growing!


